


I got to spend some quality time with my friend NISHAM today, and learned how to make that bird. So here is part..err..five.. of this ongoing series. Right then lets begin. You need two strips (basically one "fanvai" (leaf) with the eakle removed) The first step is to tie a basic knot towards one end of one of the strips. Which should give you this.

Notice how there's a bit left on the right (ooh oxymoron!). This will form the tail section so leave enough for it there, but not too much so that you'll run out of material later. Now you take the second strip and insert it into the knot like so.

Notice how the shiny side faces up? yea that's important if you want all shiny on the outside when you're done. Got it? now hold that intersection down and turn the thing around...
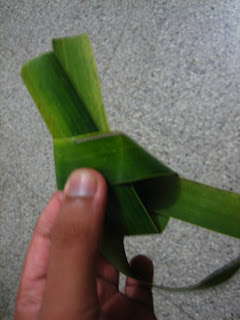
So far so good. Take the lose end of the second strip, and run it between the protruding tail section.

Note how the non-shiny side faces up. Alright now here's where it gets a whee bit tricky. observe the next picture carefully. We're still playing with the lose end of the second strip here.
 See how it goes around, between the tail and into the knot. That end now needs to over OVER the loop formed by the second strip itself. Notice how I'm holding the thing? Holding it like this helps keep the strip from coming out of the tail section. Now pull the through that knot and over that loop like this.

Alright now grab the two lose ends that form the tail with one hand, and the other two with the other hand, and pull! carefully now.

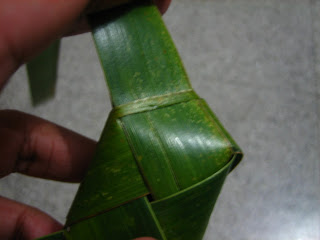
Pull that nice and tight. You're almost done with the body section. Alright now after you've tightened that up you should have something like this.
 You should have four loose ends, two on each side. Of those, on of them are going to be neatly tucked and the other is going to be on the outside like is shown in the picture above. What you need to do is make an incision on the cross strip to tuck that loose strand in.
Repeat that for the other side as well. Congratulations, you have now completed the body. You should have a nice even structure now, with the loose strips of one end being shorter (the tail, which is also complete) and the other much longer (for the head and wings.)
Now we go for the wings and head. On the head side, make a similar incision to the one you made to tuck in that loose end. Next, pull the strip through it (not completely), forming a loop.

Repeat for the other side as well,

That loop needs to be roughly the same size as the width of the strips (because you're going to pull them through it). Now for the wings, take one of the ends and pull it through that incision yet again, forming a second (larger) loop that will form the wings

Repeat this for the other side as well, which will leave you something like... this

Great now you've got wings. You're almost done now, just a few more loops. It's time to form that head! Take one of the ends, and insert it into the loop that is further away from it.

here's another perspective on that one..

Don't tighten that up just yet. You need to loop the other loose end OVER the one you just formed, and into it, then thread it through the small loop that's away from it...

Alright now you can tighten it. Slowly pull that through (grab the beak) to form...

see that? Yay you did it! All that's left to do now is cut those things up into any shape you like and you're done. Congratulations! You are now becoming more and more with nature.Here's the one I just made to take pictures for this tutorial.

No comments about my hand needing moisturizer please. I already know that :P
If you enjoyed that, make sure you check out the others in this series.


 See how it goes around, between the tail and into the knot. That end now needs to over OVER the loop formed by the second strip itself. Notice how I'm holding the thing? Holding it like this helps keep the strip from coming out of the tail section. Now pull the through that knot and over that loop like this.

 You should have four loose ends, two on each side. Of those, on of them are going to be neatly tucked and the other is going to be on the outside like is shown in the picture above. What you need to do is make an incision on the cross strip to tuck that loose strand in.
Now we go for the wings and head. On the head side, make a similar incision to the one you made to tuck in that loose end. Next, pull the strip through it (not completely), forming a loop.


see that? Yay you did it! All that's left to do now is cut those things up into any shape you like and you're done. Congratulations! You are now becoming more and more with nature.Here's the one I just made to take pictures for this tutorial.

No comments about my hand needing moisturizer please. I already know that :P
If you enjoyed that, make sure you check out the others in this series.
1 Comments:
Could you make a video? This is pretty hard to make because the pictures make me confused :(
Post a Comment