Showing posts with label photography. Show all posts

Jul 8, 2009

Removing dead/orphan entries from f-spot's database

This seems like a common problem for a lot of people -

dead or orphaned entries in f-spot :| technically, you shouldn't go behind f-spots back and delete the files directly, but sometimes ...well shit happens. like for me, I somehow managed to re-import the same pictures into my database twice..and was left with a crapload of duplicate images in my album..

the first problem is easily solvable, simply running

fdupes -dN

removes the duplicate entries in the given directory (use with caution)

but that still left us with f-spot's internal database still linking to dead entries

this makes me very sad...very very sad, as f-spot doesn't have a "refresh catalog" option.

so I came up with this not-so elegant but it works solution... so here we go

PROCEED WITH CAUTION....CAUTION I SAY!!! NOTE THE PROCEDURE BELOW WILL REMOVE REFERENCES TO MODIFIED VERSIONS AND SHITE AS WELL...


1.backup your database
cp ~/.gnome2/f-spot/photos.db ~/.gnome2/f-spot/photos.db.backup
CHECK CHECK AND DOUBLE CHECK if that worked..

2.extract the photo information
sqlite3 ~/.gnome2/f-spot/photos.db 'select id,uri from photos;' > entries
3.check for the dead entries

cat entries | while read i;do if [ ! -e "$(echo ${i} | cut -f2 -d'|' | sed 's/file:\/\///g')" ];then echo ${i};fi;done > deads

watch for line breaks...the above is a single line! Give it time to process...it may take a while depending on your db size (mine took 4 minutes)

4.delete the entries from the main table

cut -f1 -d"|" deads | while read i;do sqlite3 ~/.gnome2/f-spot/photos.db "delete from photos where id=${i};";done
.... AND from the version table

cut -f1 -d"|" deads | while read i;do sqlite3 ~/.gnome2/f-spot/photos.db "delete from photo_versions where photo_id=${i};";done
5. Now remve the working files you created

rm entries deads

and tadaaa!!!!!

a few things to note
1.it's not perfect
2.if you have edited versions, and the original is missing, references to edited versions will be removed.
3.you can fine tune the SQL in step 2 to restrict removals to specific folders or such;
eg:
SELECT id,uri FROM photos WHERE uri LIKE '%/2009/07/%';
Oct 2, 2008

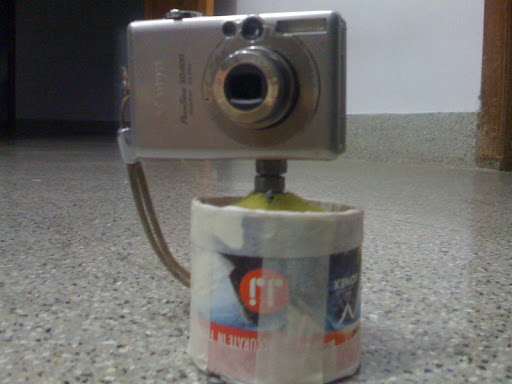
DIY 3-axis ballhead tripod thingie (a.k.a The tennis-ballpod!)

Make a ballhead tripod out of nothing more than a tennis ball, a nut, and a can of pringles?

Ahhh what the mind of a cheap ass guy who's bored to death can cook up. I've always wanted one of those mini-tripod things that I could carry around in my pocket, but have been either too lazy or too cheap to actually buy one...well mostly just lazy. I'm not really a photography geek anyway.

'Nuff talk, let's get down to business. On with this unholy abomination, kinda-sorta dedicated to iekko and her new camera.

First here is the finished product.


Let's get started.

Let's go digging in your garage. We're looking for the following items.
  • one tennis ball
  • one tube that snugly fits the tennis ball, like a can of lay's stax (pringles seem to be a bit larger)
  • one 1/4" bolt (make sure it's got the right tread), a nut, a butterfly nut and a washer.
That's all!


Take the ball, and poke a hole in it using a knife or something. In retrospect it's better if the hole is actually a HOLE and not a cross cut like I did here.


I made two mistakes in the above step. Like I said, it's better if you can make a whole (roughly the size of the bolt, maybe a bit larger but not too large), and the second mistake being I opened it up too much. Be careful!

Next, insert the bolt head first into the hole. place a washed on top to snug it up a bit, and insert a nut. Tighten the nut as much as you can. And voila! the ball is done! (btw these tennis balls stink like ass when you open em up.. just a warning.


Now we move on to the can. Tape up the bottom. Use a piece of cardboard to plug it up if it already isn't. I'm not using a Lay's Stax can or anything, because I found this empty tube in which some badminton shuttles came it. This thing fits like a glove! Also, if you bought your tennis balls in a can, that is probably the best one to use for this. There are plenty of options out there, explore! find something you can use.


Cut the can up. The height of it should be somewhere between the center of the ball and the top. (ie, taller than it's radius, shorter than the diameter) In my case, the lid of the can was indented so I cut it up to the size of the diameter.


Not take the lid, and cut a hole in it so that it will fit the ball snugly on the top. you may need to give this a couple of tries to get it just right. don't worry it's well worth the effort.


And that's pretty much it! all you have to do now is put the ball in the can, the lid ON the can and tape/glue it to keep it in place. I chose to tape it because, well to be honest I didn't know how it'd turn out.


Now for the butterfly nut. You put this on the bolt , backwards. This is so that when you screw the camera on, you can unscrew the bolt towards the camera and make a snug fit. I couldn't find a butterfly nut so I used a regular nut instead.

That's it! you have yourself a tennis-ballpod! This thing turned out to be surprisingly versatile, and much better to use in practice than I had originally anticipated. The one pictured above gives me about 120 degrees of movement around the two horizontal axes and 360 around the vertical. Not too shabby.

You might want to add a little weight to the bottom to keep it from tipping over when the camera is tilted all the way over. As it is, it's able to support my point-and-shoot almost all the way without any problems. I wouldn't recommend using this with a bigger camera, although with better construction, it should easily be able to "handle it"


Sep 16, 2008

HDR Imaging

If you're anything like me, and you enjoy a good sunset then you'll probably know what this is about. Have you ever wanted to capture all those colours on your digital? maybe you tried, but it always seems so so much blander than the real thing? Well that's because you can only get so many colors on there. HDR saves the day! it stands fo High Dynamic Range. Basically - more colors :) Here's a picture I took today, nothing fancy but gets the point across.


and the same done HDR


see the difference? I'm telling you it's the shit! Especially if you have one of those really cheap cameras..like me :( Basically what you do is take three shots (or more) with varying levels of exposure (one under, one over and one just right), and then combine them. It's quite easy in photoshop (since CS2, there's a "merge to HDR" option somewhere in there) Now you might want to consider upgrading your camera's firmware to CHDK, which will allow you, among other things to a) Shoot in RAW, and b) shoot with auto bracketing. Both these will help you immensly with the HDR business (specially shooting RAW) have a look into it. It's worth your while.

Upgrade your Canon Camera with CHDK

There's a really good chance that most of you are already familiar with CHDK, but if you're not - you should definitely give it a shot.

CHDK is a firmware enhancement that operates on a number of Canon Cameras. CHDK gets loaded into your camera's memory upon bootup (either manually or automatically). It provides additional functionality beyond that currently provided by the native camera firmware.

Basically it takes your crappy camera and stuffs in a bagload of features that're usually found in much much more expensive ones (and some not in any!) Sounds good? I can assure you would be extremely stupid not to try it. It's amazing the things you can do with an old busted point and shoot with the enhanced features. (including and not limited to shutter speed control, custom ISO settings, ability to run scripts,games,your momma on your camera, flash sync, USB cable remote trigger, live histograms,grids, SHOOTING IN RAW.. and MANY many more)

The best part is it's free, and completely (unless you're really stupid) harmless. You'll love those long exposure shots especially if you're a star gazer like me. My friend Keyolhubey has posted a few time lapse video's he did with his Canon A530 using an intervalometer script.

head on over to CHDK and get started now. It's as easy as grabbing the proper firmware image and putting it on your camera's memory card. How can I tell?!

Q. How can I get the original firmware version number of my camera?

A. To get the version number, you need to:

  • create a file called ver.req in the root directory of your SD card. Be sure to save it as all files and not text. It might be necessary to create the file name explicitly in upper case. e.g. VER.REQ
  • IMPORTANT: Note that it is spelled ver.req, as in VERsion REQuest, that Q is NOT a G, Type it correctly!!!
  • switch on the camera in playback mode and wait for the main screen (don't switch on in rec mode and change to playback later)
  • press the
  • set+disp. buttons together (press set first, hold it down, then press disp.).

You will see a string like Firmware Ver GM1.00E. The 1.00E part is the firmware version.

ver.req is just an empty dummy file.